
[Werkeltisch] #149 – Gute Reise mit Create A Smile

Header Werkeltisch

please scroll down for english version :)

Der Hintergrund lag für Wochen auf meinem Tisch. Kennt man, gelle? Man werkelt was, findet es toll und weiß am Ende trotzdem nicht, was man damit machen soll.
Kay, vor ein paar Tagen dann kam meine neuste Order von CreateASmile an – unter anderem mit dem tollen Set „glowing seaside“. Das wollte ich unbedingt mit irgendwas verwenden und hatte diverse Stücke Papier in der Hand.. und irgendwann auch diesen Hintergrund.
Bisher habe ich diese Hintergründe immer nach dem gleichen Muster gemacht und immer hochkant verwendet. Mehr aus Versehen (viele Versehen in letzter Zeit!) habe ich ihn dann mal seitlich gehalten – und tadaa! Sieht ja aus wie Wasser! Ein Meer! Glowing Seaside! Her mit der Tinte!
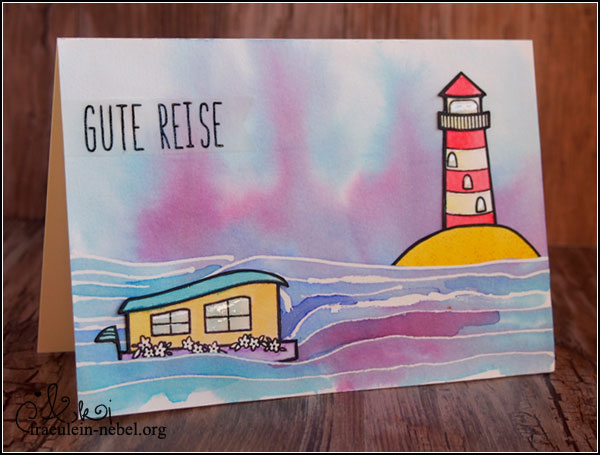
Karte "Gute Reise" mit CreateASmile und Distress Ink | fraeulein-nebel.org

Schiff und Leuchtturm sind auf Aquarellpapier gestempelt und mit Distress Ink coloriert. Der sandige Hügel ist freestyle entstanden; Distress Ink gewischt und mit einem schwarzen Marker eine Stempellinie geschummelt.
Eine Kurzanleitung für die Hintergrundgestaltung gibt es bei Debby Hughes – ist ganz einfach, ihr braucht eigentlich nur Masking Fluid und Farben dazu.

An zwei Stellen habe ich den Hintergrund eingeschnitten, damit ich die Stempelteilchen „in den Hintergrund“ bringen konnte.
Der Text ist auf Pergamentpapier embosst und direkt auf die Karte geklebt worden – fertig.

___________________________________________

I had this background on my craft table for a few weeks now. You might know that feeling; you create something you like but you end up not knowing how to go on with it.
I wanted to use it on a top folding card, but turned my paper in the wrong direction – and whoops, look at this! Looks like water. Like the sea, maybe. Lucky me, because I received my order from CreateASmile a few days ago, together with the stamp set „glowing seaside“. So I had to combine it with the cute ship and light house from that set!

I stamped my images on watercolour paper and coloured them with Distress Ink. For the hill, I blended some colour on the same paper and cut the shape as needed. I faked the black stamp line by using a black marker. ;)
If you need advice on how to create the background, I highly recommend checking this blogpost by Debby Hughes – it’s really ease, you only need masking fluid and some colours.

I cut a slit in my background to slide my stamped images in place; the sentiment is stamped on vellum in black ink and heat embossed.
That’s it! Cute and simple card done.

Material

Papier: SU! „vanille pur“, Aquarellpapier, Vellum/Pergamentpapier
Tinte & Farben: Memento „tuxedo black“, VersaMark Ink, Ranger Distress Ink
Stempel: Create A Smile „glowing seaside“
Stanzen: lawn fawn „stitched journaling card“
Sonstiges: Falzbein, Fiskars Schneidbrett, dm Kleberoller „paradies“, Ranger Multi Medium „matt“, EK Success Tweezers, Ranger Glossy Accents, Cuttermesser, Wasserglas & Pinsel, Papierschere
[Werkeltisch] #148 – graue Bäume mit PurpleOnionDesigns

Header Werkeltisch

please scroll down for english version :)

Ehm jah. Ich weiß gerade nicht genau, was ich über die Karte sagen soll. Weil kein Text draufsteht, könnte man sie theoretisch vielseitig einsetzen. Praktisch sieht sie für mich aus wie eine Trauerkarte – weil wegen Farben, Bäumen und nochmal Farben. War nicht so geplant, ich habe nämlich Schwierigkeiten mit Trauerkarten, noch mehr als mit Hochzeitskarten.
Aber tjanun, anscheinend habe ich ungewollt eine Trauerkarte gewerkelt.

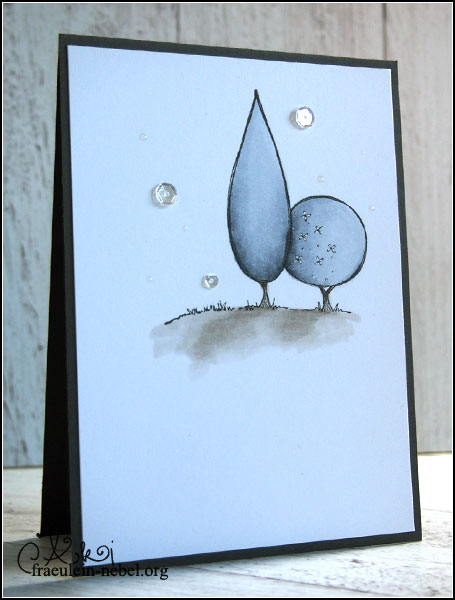
Karte "graue Bäume" mit PurpleOnionDesigns und Copic Marker | fraeulein-nebel.org

Die Bäumchen kommen aus dem Hause PurpleOnionDesigns, die haben nur RubberStamps – also Gummistempel. Nur den Gummiteil, um den Schaumstoffteil muss man sich selbst kümmern. Ist nicht weiter tragisch, und das Montieren der Stempel macht sogar Spaß. :D Den Hersteller kannte ich schon länger, die Motive waren mir bisher aber zu „süßlich“. Aber die Bäumchen und Blümchen.. genau mein Ding.

So. Bäume gestempelt, mit Copics coloriert und den Grasboden nochmal nachgestempelt. Zum Stempeln mit Gummistempeln nutze ich übrigens gerne einen klassischen Stempelpositionierer, ansonsten werden meine Abdrücke grundsätzlich schief.
Das fertig colorierte Panel habe ich auf eine graue Base geklebt und als Dekogedöhns noch ein paar Pailletten aufgeklebt. Und weil ich dafür mein Glossy Accents eh draußen hatte, habe ich grad noch ein paar Punkte dazu getropft.
___________________________________________

I don’t really know what to tell you about this card. You could use it for anything, really, since there is no sentiment stamped on it. But because of the colours and the trees it looks like a sympathy card. Well, that was not planned – I tend to struggle creating sympathy cards, even more than wedding cards. But it seems that I created one by accident.

The trees are from PurpleOnionDesigns, a stamp company selling rubber stamps only. And by rubber stamps I mean the rubber part; you need to buy the foam to mount it on. It was kinda fun to mount the stamps, by the way. :) I’ve heard of that company long time ago but never liked their images. They looked way to cute and childlike to me; but I really like their new collections of flowers and trees.

I stamped the trees in copic friendly ink and coloured them with copic markers. I like to use a classic stamp positioner for stamping with rubber stamps – else my images turn out all crooked. :twisted:
The stamped panel is mounted on a base of plain grey cardstock. To add a bit more detail I glued on some sequins. I also added some tiny dots of Glossy Accents to go with the sequins.

Material

Papier: SU! >“schiefergrau“, „vanille pur“
Tinte & Farben: Memento „tuxedo black“, Copic Marker CIAO
Stempel: Stacey Yacula Studio für PurpleOnionDesigns „garden trees“
Stanzen:
Sonstiges: Falzbein, Fiskars Schneidbrett, dm Kleberoller „paradies“, Pailletten, Ranger Multi Medium „matt“, EK Success Tweezers, Ranger Glossy Accents, SU! stamp-a-majig

[Werkeltisch] #147 – glowing flower mit Perfect Pearls

Header Werkeltisch

please scroll down for english version :)

Endlich darf ich euch die Karte zeigen. Schon Anfang Juni wurde sie von Mami geordert, als Gutscheinkarte für meine Mutter. Da die aber jetzt erst Geburtstag hatte.. ich saß ein wenig auf glühenden Kohlen. ;)
Bei instagram habe ich euch schon ein Mini-Video gezeigt, um den tollen Schimmer der Karte einzufangen. Von der Karte gibt es noch eine Version in blau und eine in bunter mit vielen verschiedenen Blüten.

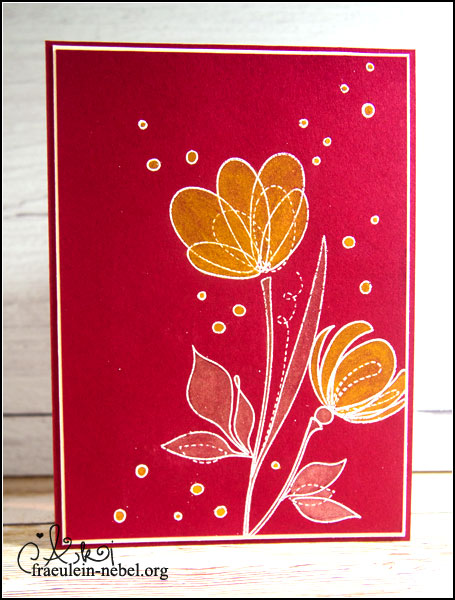
Karte "glowing flower" mit Simon Says Stamp und Ranger | fraeulein-nebel.org

Die Karte wurde genauso gemacht wie die verlinkte oben; Stempeln, embossen, mit Pigmentpulver matschen und malen. Tatsächlich geht das alles recht schnell und der Schimmer durch die Perfect Pearls ist wunderschön. :eek:

___________________________________________

I’m finally able to show you this card! My grandma ordered it in the beginning of June for my mother’s birthday which is in.. july! So I felt like a cat on a hot tin roof because I wanted to show you the card right away – but my mother reads my blog sometimes, so I had to wait. :twinkle:
By the way, you get the chance to see a mini-video on my instagram account – the shimmer and shine of this card is hard to catch on a photo.
I created a second card like this one in blue and one in multiple colours with lots of different flowers.

I created this card the same way as the one linked above: I stamped the images, covered them with embossing powder and heat embossed them. I mixed a paint with pigment powder and water to paint the stamped images.
Actually, these cards are really fast to make and the shimmer you get with Perfect Pearls is really pretty. :eek:

Material

Papier: SU! „waldhimbeere“, „vanille pur“
Tinte & Farben: Versamark Ink, Ranger Perfect Pearls „perfect gold, „perfect pearls“, „rust“
Stempel: Simon Says Stamp „spring flowers“, „sketch ranunculus“
Stanzen:
Sonstiges: Falzbein, Fiskars Schneidbrett, Pinsel, Wasserglas, Deckel von leeren Flaschen, dm Kleberoller „paradies“, Hero Arts Embossingpulver „white“, SU! Heißluftföhn